 Pin it
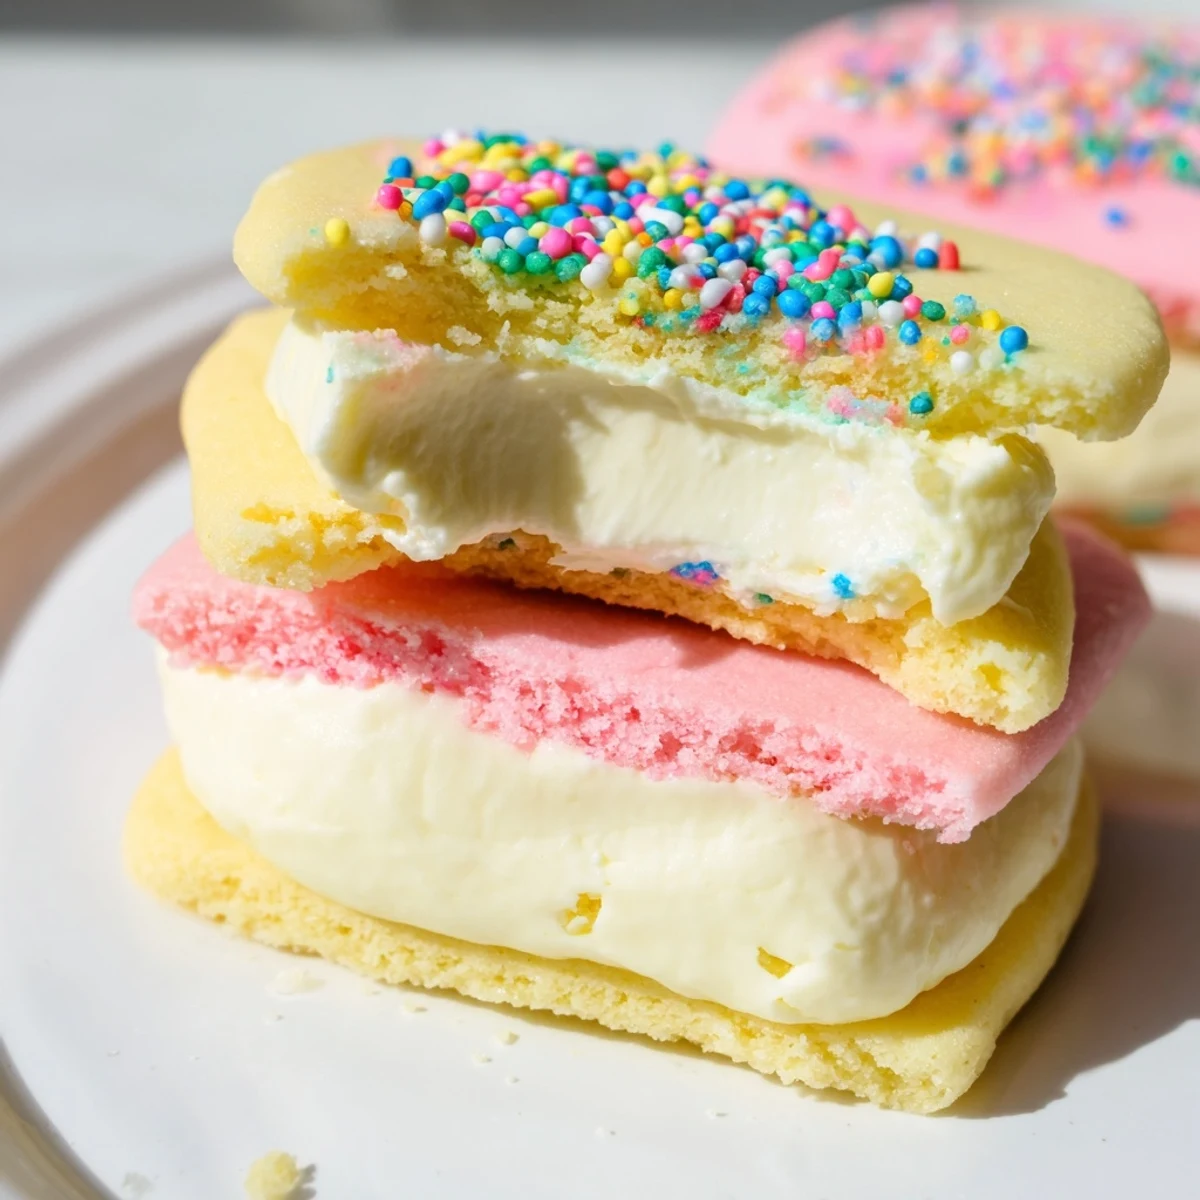
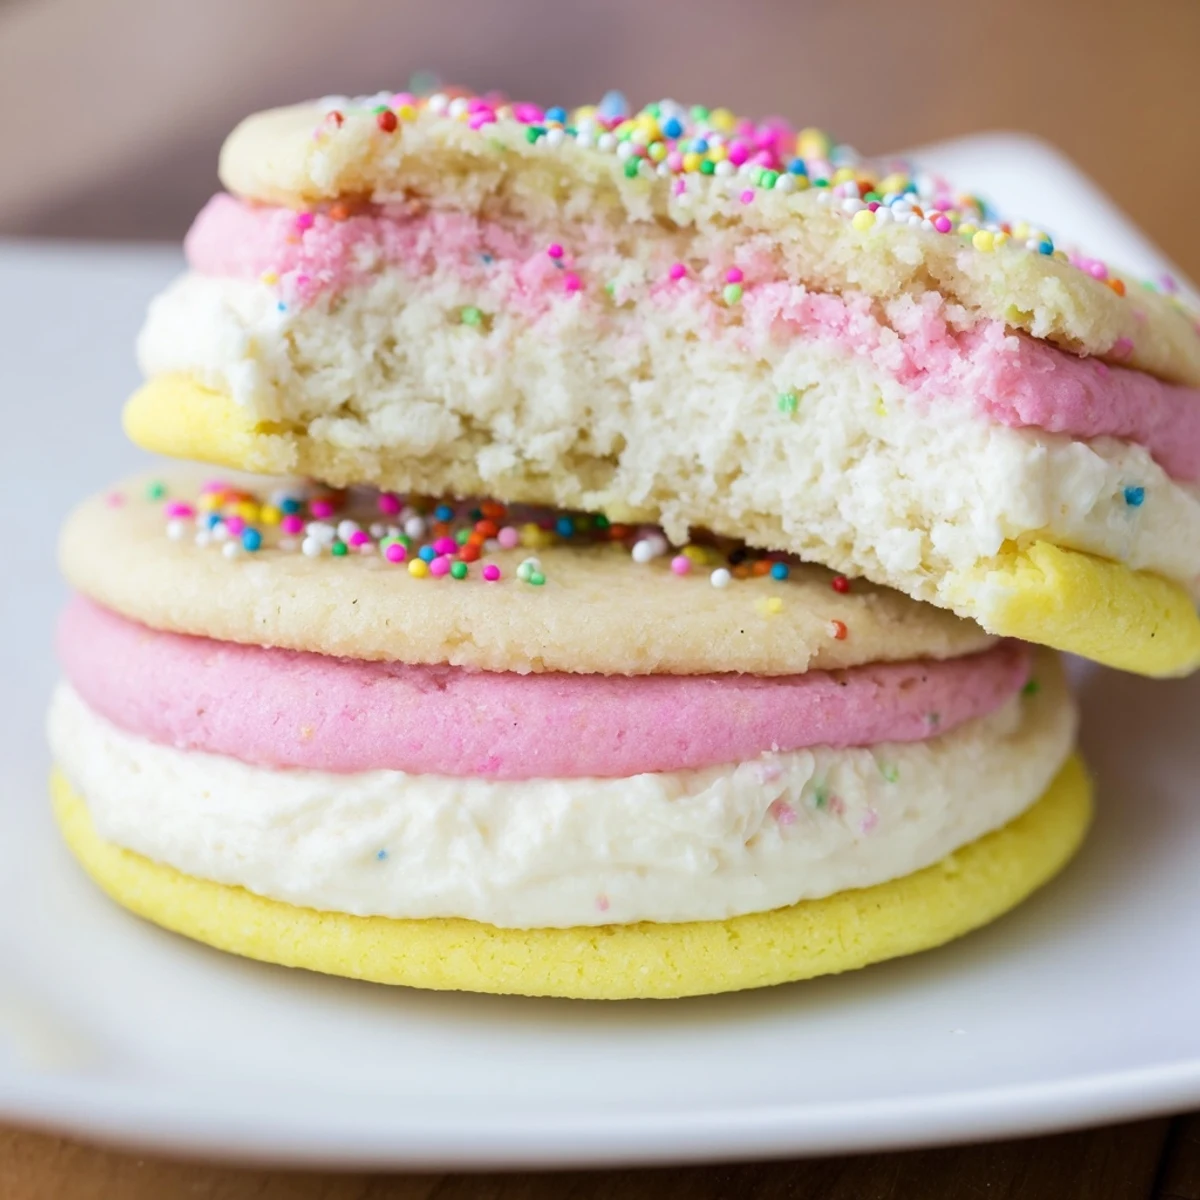
 Create these stunning pastel sugar cookie sandwiches featuring soft, colorful cookies paired with smooth vanilla buttercream. The dough divides easily into bowls for tinting with gel food colors in pink, yellow, blue, green, or purple. Each cookie bakes in just 10-12 minutes until edges are set while centers remain perfectly tender. The creamy vanilla buttercream filling whips together quickly with butter, powdered sugar, and vanilla. Assemble by spreading or piping filling onto cooled cookies, pressing matching pairs together. Decorate edges with sprinkles for extra festive flair. These handheld treats make excellent party desserts, Easter basket additions, or spring bake sale contributions.
The first time I made these pastel sandwich cookies was during a rainy spring weekend when my kitchen felt too gray and quiet. I stirred that first drop of pink gel food coloring into the cream-colored dough and watched it marble through like a sunrise. Something about seeing those pastel mounds lined up on baking sheets turned the whole day around. Now they are my go-to whenever I need to bake something that feels like a celebration without the fuss.
Last Easter my niece insisted we make every color of the rainbow even though I only had five gel colors. She pressed her tiny hands into the mint green dough and declared it her special job. We ended up with flour everywhere and mismatched cookie sandwiches, but those were the ones everyone reached for first. Sometimes the imperfect ones taste the best anyway.
Ingredients
- 2 1/2 cups all-purpose flour: Sift this first if it has been sitting in your pantry for a while, it makes the dough so much smoother
- 1/2 tsp baking powder: This gentle lift keeps the cookies tender rather than cakey
- 1/4 tsp salt: Do not skip this, it balances all that sugar and makes the vanilla sing
- 1 cup unsalted butter softened: Leave it out for at least an hour, cold butter creates sad dense cookies
- 1 cup granulated sugar: Cream this thoroughly with the butter until it looks pale and fluffy, this step is worth every minute
- 1 large egg: Room temperature eggs blend better into the dough
- 2 tsp pure vanilla extract: The good stuff matters here since vanilla is the star flavor
- 1/2 tsp almond extract: Even almond skeptics love this subtle background note
- Gel food coloring: Use pastel gel colors, liquid dye will make your dough too sticky and impossible to work with
- 1/2 cup unsalted butter softened: For the buttercream, same room temperature rule applies
- 2 cups powdered sugar sifted: Lumpy powdered sugar is the worst, trust me and sift it first
- 1 tbsp milk or heavy cream: Start with less and add more until you reach your desired consistency
- 1 tsp pure vanilla extract: Fresh extract for the filling makes all the difference
- Pinch of salt: Just a tiny pinch keeps the buttercream from tasting cloyingly sweet
- Sprinkles: Press these gently into the exposed buttercream so they actually stick
Instructions
- Preheat and prepare:
- Set your oven to 350°F and line two baking sheets with parchment paper, this prevents sticking and makes cleanup so much easier
- Whisk the dry ingredients:
- In a medium bowl combine the flour, baking powder, and salt, whisking until everything is evenly distributed
- Cream the butter and sugar:
- Beat the butter and sugar together for a full 2 to 3 minutes until the mixture looks pale and fluffy, this creates air pockets for lighter cookies
- Add the wet ingredients:
- Mix in the egg, vanilla extract, and almond extract until combined, scraping down the sides of the bowl to catch any escaped flour
- Combine the dough:
- Gradually add the flour mixture mixing just until you no longer see dry streaks, overmixing makes tough cookies
- Divide and color:
- Split the dough into 4 or 5 bowls and tint each with a different pastel gel color, wear gloves unless you want rainbow hands for days
- Portion the dough:
- Use a tablespoon or cookie scoop to drop dough balls onto the prepared sheets leaving 2 inches of space between each
- Flatten and bake:
- Press each ball gently with your palm then bake for 10 to 12 minutes until edges are set but centers still look slightly soft
- Cool completely:
- Let the cookies rest on the trays for 5 minutes before moving them to a wire rack, warm cookies melt buttercream into a sad puddle
- Make the buttercream:
- Beat the butter until creamy then add the powdered sugar, vanilla, salt, and milk, whipping until light and fluffy
- Assemble the sandwiches:
- Spread or pipe buttercream onto the flat side of half the cookies and top each with another cookie, pressing gently
- Add sprinkles if desired:
- Roll the edges in sprinkles immediately after assembly so they adhere to the soft frosting
 Pin it
 My friend requested these for her baby shower and I stayed up until midnight piping buttercream and listening to podcasts. The next morning she texted me that they were the first thing to disappear from the dessert table. Those little moments of joy baked into something so simple are why I keep coming back to this recipe.
Making The Dough Ahead
You can prepare the colored dough balls up to 3 days in advance and store them tightly wrapped in the refrigerator. The flavors actually develop beautifully during that rest time. Let the chilled dough sit at room temperature for about 20 minutes before scooping or it will be too hard to work with.
Getting Even Colors
Start with a tiny amount of gel coloring, you can always add more but you cannot take it back. I use a toothpick to add color drop by drop, kneading the dough between additions. Some colors like yellow need less pigment while purples and blues can turn grayish if you are too heavy handed.
Storage And Serving
Once assembled these cookies stay fresh in an airtight container at room temperature for up to 3 days. After that the cookies start to soften from the buttercream moisture. For longer storage, freeze the unfilled cookies and frost them the day you plan to serve.
- Place a piece of parchment paper between layers of stacked cookies to prevent sticking
- If the buttercream feels too stiff after refrigeration, let it sit at room temperature for 15 minutes before assembling
- These taste best when served at room temperature, not cold from the fridge
 Pin it
 There is something about pastel cookies that makes people smile before they even take a bite. I hope these bring a little color to your kitchen too.
Recipe Q&A
- → How do I prevent the pastel colors from fading during baking?
-
Use gel food coloring instead of liquid for vibrant, fade-resistant colors. Gel pigments are concentrated and maintain their hue through the baking process better than water-based alternatives. Add coloring to divided dough portions and mix thoroughly until uniform.
- → Can I make the cookie dough ahead of time?
-
Yes, prepare the dough up to 3 days in advance and refrigerate wrapped tightly. The colored dough portions can also be frozen for up to 3 months. Thaw overnight in the refrigerator before rolling and baking.
- → What's the best way to achieve uniform cookie sizes?
-
Use a cookie scoop or tablespoon to portion consistent dough balls. This ensures even baking and professional-looking sandwiches. Level off excess dough for identical portions across all colors.
- → How long do assembled cookie sandwiches stay fresh?
-
Store assembled cookies in an airtight container at room temperature for up to 5 days. For longer storage, keep unfilled cookies in the freezer and fill with fresh buttercream before serving.
- → Can I substitute the buttercream filling?
-
Absolutely try lemon curd, strawberry cream cheese frosting, or chocolate ganache as alternative fillings. These variations complement the vanilla sugar cookies beautifully while adding different flavor profiles.
- → Why did my cookies spread too much while baking?
-
Chill the dough balls for 15-20 minutes before baking if your kitchen is warm. Also ensure your butter wasn't overly soft when mixing the dough. Properly chilled dough maintains shape better in the oven.
